So you’ve probably just bought your domain and web hosting, looked at the WordPress dashboard and thought to yourself, where do I even start??
It can look very intimidating at first, but I promise you will catch on quickly!
It’s just like any new skill you learn or get educated on. It may seem complicated in the beginning, but once you’ve been doing it for awhile, it becomes second nature.
This lesson will give you an understanding of how a lot of the settings and features work in WordPress. I’ll go through the basics of how to get your blog set up correctly from the very beginning.
This is how your website will start to take shape and give it the design that you want. After you complete all these steps, your blog will have come to life (hopefully) exactly how you envisioned it.

1.Select a theme
The joy of setting up a website or blog in 2020 is that you don’t have to be a computer nerd to do it!
Luckily for us, the computer programmers have designed ways for us to install a ready-made theme on our website with ease.
This allows our blog to look pretty and put together with NO coding experience required.
More blogging lingo that you’ll want to be aware of:
What is a WordPress Theme?
A theme is a set of files with pre-written code that allows you to customize your website without needing coding knowledge.
A theme defines how your blog will look and provides the framework to create the styling of your WordPress site.
Websites can either be built with custom code (where you need the expertise or lots of $$$) or have a theme installed that comes with the coding already written.
If you don’t know website coding (like most people), you’ll want to select a pre-made theme to help you accomplish the design aspect.
Before you decide, it’s important to understand that every theme has different capabilities and customizations.
Some of the basic features and customizations will include:
- Page layout
- Customizing your colors
- Menu categories
- Header area with logo
- Footer area and menu
- Displaying your blog posts on your home page
- Space for widgets
- Sidebar
Tips to Get Started
- Don’t strive for perfection
Once you start customizing and seeing your website come to life, you may be inclined to strive for perfection.
It’s easy to keep tweaking and changing until you get it absolutely perfect.
However, this is an area that you don’t want to get caught up in because it will waste valuable time that you can spend writing content for your blog.
It’s better to get the material out there to be seen and you can worry about making changes later.
You will end up making improvements to your design many times throughout the life of your blog, so just wait until you really have the need to do it.
You’ll see that your content will be read regardless of what your website looks like!
- Understand the Limits of Your Theme
If you select a pre-made theme (which is what you should be doing when you first start out), the code is already written and templates are set. So there is generally not a lot of wiggle room in making changes.
Therefore, your blog may not look exactly how you want it to, but if your content is good, you will still have readers!
Some themes have more flexibility than others and luckily you can see a live demo version of any theme that you wish to use.
However, even with a live demo, it’s still difficult to envision what your website will look like using your personal images, logos, and content.
- Stay within your budget
So this is where the fun starts happening. You’re designing a website that’s all yours and you want to make it look amazing and the exact design you have in your head.
You can spend thousands on website design, but it’s absolutely not necessary.
My biggest suggestion is to avoid any extra costs in the beginning or at least until you start making money.
Once you make your first 10, 50, or 100 dollars, you are ready to start investing back into your business.
Your style WILL change as time goes on so save your money to buy a theme when you’re ready to commit to a new style.
And that brings us to…
Free vs. Paid Themes
Just as with blog hosting, you get what you pay for.
Free themes will ALWAYS have less features than paid themes.
Paid themes will have more options for customizations, however, you still won’t be able to change EVERYTHING you want (as it’s still pre-coded).
It’s totally fine to start out with a free theme. There are still beautiful websites that use them too.
Trust me, once you add your colors and personal touch to it, you will be amazed at how different it will look!
Once you start driving more traffic toward your website and grow an audience, you may want to upgrade to a paid theme.
However, let this be a decision you make down the road because it’s not difficult to change your theme.
What to look for in a theme
The most important thing about whatever design you pick is functionality. Your blog needs to be easy to navigate, clean, and mobile-friendly.
Top things to look at in a WordPress theme:
- Keep it simple. Easy navigation, easy-to-read fonts, and the ability for readers to engage with your content. A layout that is too complex will drive your reader away. They are coming to your blog to read information not to look at a fancy website.
- It has to be responsive. Most people now are searching the internet on their mobile devices. Having a responsive theme just means that it transfers well for visualization on a cell phone, tablet, or between different browsers.
- Support. Honestly, a lot of themes do lack in the support department, but it’s something to look for when choosing a theme. There will always be little fixes that you need to make or changes that you can’t figure out and it’s helpful to have the person who designed it help you out for free.
- Visually appealing– Of course, you want your website to look great so this is a big reason most people choose their theme. There are so many to choose from so you are bound to find one that fits your taste.
No matter what theme you pick, read ratings and reviews to make sure there are no issues with it.
You’re not married to your theme. Most bloggers change their themes several times over the course of their careers so don’t get too hung up on it at the beginning.
My Blog Theme Recommendations
Choosing a theme is completely a personal preference. Only you know what your vision is for your website and what you want it to look like based on your style, niche, and design.
Therefore, it’s not possible for me to tell you exactly which one to use.
However, I will give you some examples and options that I have seen and loved, as well as the one I use. If you’re starting a mom blog or are a woman starting any type of blog, most of these themes are for you!
When choosing a theme, keep in mind the layout and overall structure of the site design. You can completely change the color scheme so that may help you to visualize what your site will look like.
Here are some gorgeous, feminine themes to make your website pretty. Sorry for giving you so many options because I know that makes decisions harder.
*Note: Some of these themes require an additional Genesis framework so keep in mind, that will be an additional cost added to the theme (around $65).
Hello You Designs – My theme is from Hello You and I love the simplicity and feminine design that they offer.


Here is a large list of some other great feminine WordPress themes.
Divi Theme
Divi is one of the most popular themes because it’s so easily customizable and VERY user-friendly.
It’s a very unique theme because it has a lot less restrictions. This allows you to really bring your vision to life without spending thousands on custom web design.
The reason I have never used it is because it seems like you have to create everything from scratch and I’d rather have it done for me.
However, if you have a specific vision for your site that you aren’t seeing elsewhere, this may be the answer.
It gets rave reviews so it must be good and I’ve seen many gorgeous websites made with it. You can give Divi a try here.
Free or Premium WordPress Theme Options
To find a free theme that you like, you can log in to your WordPress dashboard, click on Appearance, and click on Themes.
The themes that you have downloaded will be listed here including the one you chose from Blue Host. If you want to look for more free themes, you can simply click the big + button, and you will be able to pick between hundreds of beautiful free themes.

There are soooo many to choose from but try not to waste too much time here.
My favorite FREE feminine WordPress themes are:
Blossom (this was my first WordPress theme)
There’s a whole variety of free feminine themes here, as well.
You’re bound to find something you like or at least tolerate until you can afford to splurge on a premium theme.
If you decide to purchase a theme, instead of installing a free one from WordPress, you will need to upload it to WordPress. Simply click on Upload Theme, select the file on your computer, and then follow the prompts to upload and activate your theme.

CUSTOMIZE YOUR BLOG
Now that you have selected your theme, you can start to customize it and really make it your own. This is where your website will really start to come to life.
You can either click on the blue Customize button under the theme you have installed or select the Customize tab on the left, under Appearance.

Each theme will have its custom settings, but you’ll normally see a page that looks a bit like this:

You will have your menu on the left, and your blog on the right. The cool thing about this view is that you’ll be able to see the changes in real-time and before you actually publish it.
You can navigate through the pages and categories to see how the changes might affect each page or post.
Site identity
This is just another place where you can change your blog name, tagline, and site icon. The site icon can be your photo, a smaller version of your logo, or any other image. Don’t worry too much about the tagline yet either, you can always change it later.
Colors/Appearance settings
Here you will be able to play around with all the color settings of your blog. Make sure you select easy to read colors for your text and links. Be sure to write the hex codes down (the corresponding numbers and letters that start with #). This will correspond to all the colors you use for your brand including logos, icons, and graphics.

Header/Footer options
Here you’ll normally be able to add your logo, your main image or slides, and additional settings. Check out how to make your own logo here. Don’t spend too much time or money on getting one designed because your style will change soon so make sure you give it time to understand what you like.
Menus
Your menu options will vary based on the theme you choose, but here you’ll be able to adjust which menu structure(s) will be assigned to your website. Don’t worry about this just yet because you don’t have any content to put in the menu. We’ll design the menu later on.
Widgets
Widgets are simple design elements and portions of your layout that you can use to build your website’s design. This is how you can change the look of your sidebars, footers, and parts of your site. They enable you to easily add text, links, categories, and other types of information to specific areas (determined by your theme).
Each section is broken up into widget areas where you can add certain elements of your choice. Your theme should have more information on this. You can read a bit more about widgets and how to use them here.
Additional CSS
If you know how to code, here is where you can add some custom bits of CSS (cascading style sheet) styling to your blog. You probably won’t need to use this feature.
Unfortunately, your theme doesn’t just come out looking exactly like that right away. In order to make your site look like the sample version, you will need to apply all these changes.
Setting up the menus, widgets, header, blog posts, etc. It can take a bit of time, but just be patient and it will start to look exactly how you have imagined.
Play around with the settings to get your site looking similar to the demo version or as close to your vision as possible. You can always come back here and change it at any time.
Pages, posts and categories
Now that we finished all the technical stuff and you set up the look and functioning of your blog, we can start to focus on the actual content of your site!
Pages, posts and categories will create the basic structure of the content your blog.
Creating Categories
Your blog post categories are the main topics for your blog. The category labels are used to organize your blog topics on the menu and make them easy for your readers to find.
For example, on Just Simply Mom I have 6 main categories:
- Pregnancy
- Childbirth
- Babies
- Toddlers
- Family
- Blogging
They can then be further divided into sub-categories (via drop-down menu) to break up your content even more.
Don’t worry about making too many categories in the beginning. As you create more content, you’ll add more and more categories to divide all of your posts.
To create a new category you simply go under Post > Categories.

Name
Your category name, for example, Pregnancy
Slug
This is just the end of the URL with the name of the category. So the slug would simply be the same as the category name.
Parent Category
The main categories of your blog will not need a parent category, but each sub-category’s parent category will be the main category.
On my blog, for example, I have 4 subcategories for Baby:
- Eat
- Sleep
- Play
- Health
When I created these 4 categories, I chose Baby as their parent category.
Description
You can write a small description of what the category is about. Some themes will display this field publicly, but others won’t. It’s typically not necessary.
After you filled all the information, just click on Add New Category.
Creating Pages
Pages are the static areas that will remain on your website menu all the time. They can be edited, but they don’t have a published date and are not ordered by date.
Creating a new page is pretty simple. You just need to select Pages > Add New and you’ll see a page like this:

Every page (and post) must have a title that will simply be the name of that page. The rest of the content is written in the main body.
Important tip: Hit the button “Save Draft” from time to time to ensure your content is always saved as you go on.
Once your page looks good and you are happy, you just need to hit the Publish button.
Remember, you can always come back here and change your content at any time. So don’t stress too much about what you write.
Essential Pages to Publish
In order to convey an important sense of legitimacy and trust from your website, you need to create a few specific pages.
These pages are standard on most blogs and websites, but can still be customized to make them your own.
About page
One of the first published content pieces that you’ll want to get done is an ‘About’ page. Readers will want to know who is behind this blog.
This can show your authority on the subject, personal life, why you started a blog, past accomplishments, goals, and what they should expect from your blog. Check out mine here.
Take some time to make this a fun, interesting, and engaging page with links to social media and how they can contact you.
Contact Page
You want your readers and other businesses to have an easy way to contact you if needed.
Set up a dedicated “contact” page, either with an embedded form or just simple instructions on how to get in touch with you through email. Check out mine here.
You can create a contact form super quick with WPForms. All you need to do is add some instructions and the plugin will take care of the rest.
Typeform is another free tool that can place an embedded, fillable form on that page with a little more flare.
Legal Pages
If you ever want to earn money from your blog, you’ll need some of these standard policies. Many monetization strategies, including ad agencies and affiliate programs, require them.
As soon as you start promoting, selling, or even offering advice on your site, you will be collecting information from your readers. This could be in the form of cookies, settings, credentials, email addresses, etc.
If you want your blog to be legal, you need to make sure you inform them of what type of information you are collecting and/or that you are making money from the links you have on your website.
The three important legal pages that every website needs are: Privacy Policy, Disclaimer, and Terms and Conditions.
You don’t necessarily have to have 3 different pages, but you need to make sure the information on this page/s is accurate and based on what you have installed on your blog.
- Privacy Policy
A Privacy Policy is a statement that discloses all of the ways you gather, use, disclose, and manage a reader’s data.
It fulfills a legal requirement to protect a reader’s privacy and you must disclose this to your visitors.
To set one up, you simply go to Settings > Privacy then click on Create A New Page. WordPress has a link to a very useful guide that will tell you exactly what you need in your Privacy Policy page.

- Disclaimer
A blog disclaimer explains that others should not rely on the information on your blog and that you cannot be held legally responsible for anything you publish on it.
To put it simply, a disclaimer protects you from lawsuits. By having a disclaimer, you “disclaim” or “deny” liability for the content you publish on your blog.
You will need to tailor your disclaimer to your specific niche and blog. For example, if you are a personal finance blogger, you will have to say that people should not rely on your financial information. If you are talking about nutrition o health, you need to make sure people understand that your posts should not be taken as medical advice.
You need to make sure your disclaimer is written in plain English and is easy to understand.
Take a look at my Disclaimer here.
Check out this post for more information: How to Write a Blog Disclaimer
- Terms and Conditions
Terms and Conditions help your readers to understand what they should expect from your blog.
A Terms and Conditions agreement is like a how-to guide for the use of your site. It covers topics like sharing intellectual property, community standards, use restrictions and helps to protect you from liability.
Here you can also protect your work and let people know its covered by copyrights. You can also share information about how you monetize your blog and disclosures about your affiliates.
Check out this post for more information:
Sample Terms And Conditions Template
Creating Your Main Menu
Adding a menu to your site, allows the reader to easily navigate from the blog post that they stumbled upon to other sections (categories, pages, and posts) of your site.
The menu is very important because it’s how people will find your content. Although a page or post is published to your site, does not mean it will be seen easily.
You will need to add it to your menu so the reader can easily find it.
To create a menu in WordPress, click on Appearance » Menus. Enter a name for your menu (I just named mine “Main Menu” – it won’t be seen) and click Create Menu.
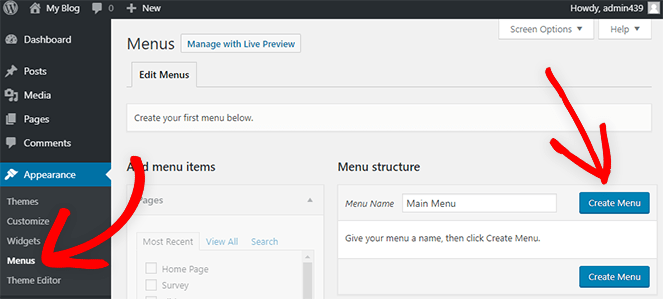
Now you can add your new pages to the menu. On the left side under Pages, check the box next to the pages you want to add to your menu. Then click Save Menu.
This is the same way you will later add categories or posts to your menu.
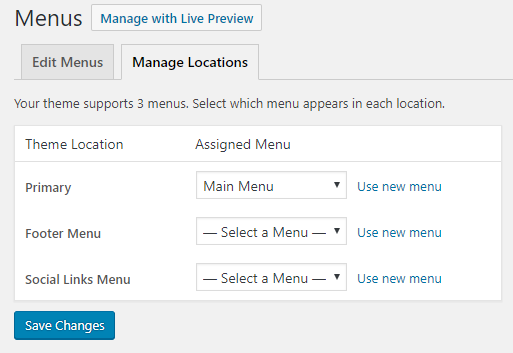
To add the menu to your main menu, click on Manage Locations tab at the top. Then select your menu in the location where you want it to appear.
Note that your menu locations will be different depending on your theme, but usually, there’s a primary, main, or header menu area to be used as the top menu.
In my opinion, t’s not necessary to put the privacy policy and disclaimer in your main menu, but you should find a place for it either in the footer or sidebar as you set up your site.
In your top menu is where you will want to place your main (or ‘parent’) categories and then as a drop down, you can put the subcategories like so.

So that is how to set up your blog! There are hundreds of different ways to customize your blog for both your personal taste and your reader’s experience.
You can play around with all of the features that we went over to see how they change the look of your site.
Now is a good time to do this, while your site isn’t getting any traffic, although you can make changes at any time.
Your style and knowledge will change as you go on so also don’t spend too much time on this now. Build some content and then revisit the customizations.
The next thing you have to do is start writing blog posts! This is where it starts to get fun and you can actually start bringing your dreams to real life!